...y'all have already seen Mom's washcloth that I made her for Mother's Day...
...I just made a quick chart in excel...don't forget that you have to do each row twice for the garter stitch letters and the heart to pop out.....
...it was a fun little project and Mom rally liked it...
...what's in your workbasket this week?...
~Have a lovely day!
Showing posts with label Patterns. Show all posts
Wednesday, May 10, 2023
Wednesday, December 09, 2020
...Christmas Socks...12.9...W.I.P. Wednesday...
...I was working on these in the car as we watched the 'movie' at the Church on Sunday so y'all saw a glimpse of these socks...there's a chart involved...so this was all I could do in the dark in the car...
...I've done a little bit more...they're really Christmas-y...and the two colour ribbing at the top is a totally new technique for me...L like it...
...so I thought I'd show you a little bit of the creative process... ...my patterns often begin with a sketch of what I envision the project looking like in the end... ...then to do a simple chart/graph like this one...I'll just use excel...and resize the cells to make a graph of little squares... ...and then I fill each cell with the colour I want... ...and then select all and add a border to all the cells...that makes it easier to count the squares when I'm knitting... ...I made this chart with flat Christmas tree limbs... ...then I made this one....that I like better... ...and then I did a snowflake pattern...
...it's a fun knit...and hopefully I'll get them finished before Christmas...
...what's in your workbasket?...
~Have a lovely day!
Friday, November 11, 2016
...Super Simple (and Quick) Light and Lacy Shawl Pattern...
Materials:
one (approx.) 7 oz skein of worsted weight yarn - I used a skein (almost whole) from the N.O.A.H. closet at church...I think it's Red Heart...
a crochet hook - I used size H...
Size
(approx.) 24" x 54" (without fringe)
Directions
Chain 89
Single crochet in second chain from needle and in each chain. (88 sts.)
Chain 6, turn
Row 1: Skip 2 sc, dc in third sc, *chain 5, skip 5 sc, dc in 6th sc, (repeat from *), chain 6, turn
All Other Rows: Skip 2 sc, dc around the loop created by the chain 5 below, *chain 5, dc around the loop created by the next chain 5 below, (repeat from *), final double crochet on each row will be in the third chain of the chain 6 loop below, chain 6, turn
Final Row: (I just stopped when I was getting close to running out of yarn)...
ch 1, turn, sc in each ch.
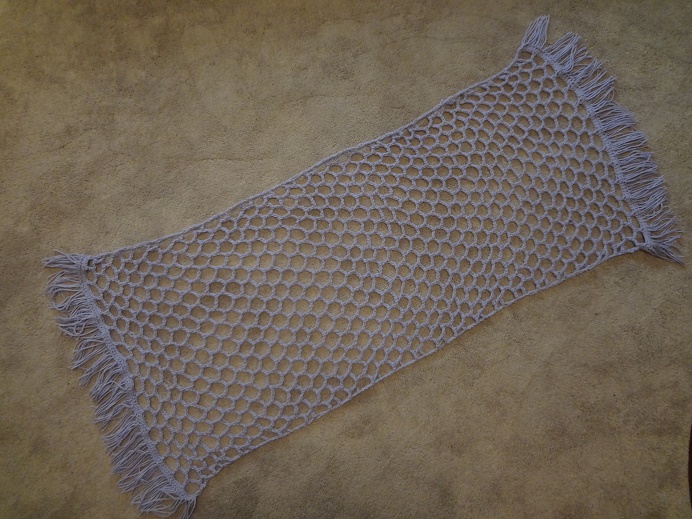
Add fringe if desired... ...and I love the sort of honeycomb effect of the lacy stitches... ...but I thought it needed a bit of a fringe...to look really 'finished'...
...so I wrapped the yarn around a piece of fringe-sized cardboard...
...I had stopped crocheting when I did in order to have enough yarn left for the fringe...but the entire shawl is one large skein of yarn...no label...but it looks like regular old Red Heart...probably a 7 oz. skein...but probably not a full one (almost though)...as I got it out of the N.O.A.H. closet and it didn't have a label... ...then I cut all the threads along the bottom of the cardboard... ...and I had a pile of fringe pieces of yarn... ...I loop them end to end...so that the fringe will be even... ...then insert the hook into the loop... ...and pull it through the stitch...one for each stitch in the end border single crochets... ...then grab both of the end threads with the hook... ...and pull them back through the loop... ...88 x 2... ...a nice light and lacy shawl...for a bit of warmth without the weight...
***Note***This pattern has not been 'tested'...I just wrote down what I did to create this shawl...so if you have any problems...please email me using the contact Affectioknit button in the sidebar...
Thanks!
~Have a lovely day!
Labels:
Patterns
Tuesday, May 24, 2016
...Super Simple Chain Stitch Shawl...Free Pattern...
Materials:
one packet of small glass - I used Darice Craft Designer multi coloured glass beads
one skein of worsted weight yarn - I used I Love this Yarn in burgundy
one spool of metallic thread - I used this bright gold thread...
a crochet hook - I used size H... ...I made a really long bead snake...just on the gold thread...I tried several times to pull the yarn through the little glass beads but was unsuccessful...so I just (quite easily) threaded them onto the gold thread... ...then I made a chain...just measured fingertip to fingertip...without stretching the chain...and single crocheted up one side... ...then when I got to the end...I started pushing up one bead per stitch...three stitches in the end and three beads...then one bead per stitch all the way down the other side of the chain...
...this side will be the top of the shawl...when I got to the end I did three stitches with one bead each in the last chain stitch...
...now you're ready to start the body of the shawl... ...basically you're going to do loops of chain 5...joined back to the previous row with a single crochet...I single crocheted around the center of each loop on the previous row...except the first row where I did a single crochet into the single crochet of the foundation row...
...and you'll have one fewer chain loop on each row...forming a triangle...
...so start with a chain 5 (pushing up a bead from the bead snake on each of the first three stitches)...and skip the next 3 single crochets on the foundation...then join the chain 5 to the foundation with a single crochet stitch...then repeat all the way across the foundation row... ...because I wanted a bead in each stitch along the outside edge... ...I pushed up a bead on the bead snake and included it in each of the first three stitches of the beginning chain loops... ...then when you get to the end...you'll go ahead and join with a single crochet...and as you slip stitch back up the last three stitches (to get to the middle stitch where you'll start the next row of loops...push up one bead per slip stitch so that the beads go all the way around the outside edge of the shawl... ...so this is how the edge looks with a bead in each stitch... ...the first three beads on the right are in the slip stitches at the end of the previous row...and the next three beads are in the first three chains of the next row...(hoping that makes sense...) ...and this shows the join with a single crochet around the center of the loop on the previous row... ...the beads around the entire edge of the shawl...I did think of a couple of alternatives for the beads...of course you could have no beads...or you could slip stitch around the entire outer edge putting a bead in each stitch...it might be simpler than adding them as you go...but it would also make the edge a little bit heavier...or a less pejorative term might be more defined...if that's the look you wanted...I wanted this sweet little prom shawl to be a wisp of shawl...just light and airy... ...but the beads do give it a nice weight and drape... ...and the finished shawl...it was super easy...I did the entire shawl in one evening...
...I hope you make one...come back and let me know if you do...
~Have a lovely day!
Wednesday, May 18, 2016
...A Sweet Little Beaded Prom Shawl...
...y'all know that many years ago...fresh from university...I taught Latin and French at an inner city high school...
...'now you may ask yourself' (talking heads)...ahem...what this has to do with knitting...or crocheting as the case may be...
...well...I read through the Aeneid yearly with my Latin IV (first half) and Latin V classes (second half)...and this is one of my very (VERY) favorite passages...I even wrote a whole graduate paper on it at Chapel Hill...
Parcae fila legunt. validum namque exigit ensem
per medium Aeneas iuvenem totumque recondit;
transiit et parmam mucro, levia arma minacis,
et tunicam molli mater quam neverat auro,
implevitque sinum sanguis; tum vita per auras
concessit maesta ad Manis corpusque reliquit.
[translation from Loeb Classics]
and the Fates gather up Lausus’ last threads; for Aeneas drives the sword sheer through the youth’s body, and buries it to the hilt. The point pierced the targe—frail armour for one so threatening—and the tunic his mother had woven him of pliant gold; blood filled his breast, then through the air the life fled sorrowing to the Shades, and left the body.
...I absolutely have hundreds of things I could say about this passage...a taunting youth is killed by a seasoned warrior...tragic...the passage from solid to liquid to air to spirit...
...but truly...the most tragic part of all...
et tunicam molli mater quam neverat auro
...and (pierced)...the tunic that his mother had woven from soft gold...
...so very sad...mention of a precious soft tunic made by his Mom...
...anywhooo... ...crocheting this shawl with a strand of gold woven in reminded me of this passage...so I thought I'd share that with you too...
...and I'll write up a proper pattern and publish it soon...it's so easy...the entire shawl is done in chain stitch...so absolutely anyone can do it...it's the very first crochet stitch you learn...with a single crochet tucking each loop in (the very second stitch you learn to crochet)...really easy and it only took an evening to finish... ...Scout's girlfriend is wearing a beautiful burgundy beaded gown for prom this weekend...and when I made the Sparkly Triangle Shawl back in February...she admired it and after I saw her dress I planned on making her one like it for prom....
...but I procrastinated a little too long to make the Triangle Shawl...and truly it'd be a little bit heavy for this time of year...she really just needed a little something to drape over her shoulders if she gets chilly...
...so I stopped at Joann's and got some burgundy I Love This Yarn...and a spool of gold embroidery thread and a pack of multicoloured glass beads... ...I made a really long bead snake...just on the gold thread...I tried several times to pull the yarn through the little glass beads but was unsuccessful...so I just (quite easily) threaded them onto the gold thread... ...the beads go around the entire edge of the shawl... ...giving it a nice weight and drape... ...it really was super easy...
...Prom is Saturday...and I'll be sure to post pictures...
~Have a lovely day!
Thursday, December 10, 2015
...Garter Ridge Baby Blanket***FREE PATTERN***
I should probably note here that this pattern has not been tested...so please if you make it...let me know if you have any problems...as I just jotted it down sort of after the fact...
Cast on 115 stitches.
Row 1: Knit 10, Place Marker (PM), Knit 95, PM, Knit 10
Work in garter stitch for 15 rows, slipping markers (SM) as you come to them.
Pattern 1:
Row 1: Knit 10, SM, Purl 95, SM, Knit 10
Row 2: Knit across slipping markers.
Row 3: Knit 10, SM, Purl 95, SM, Knit 10
Row 4: Knit across slipping markers.
Row 5: Knit 10, SM, Purl 95, SM, Knit 10
Row 6: Knit across slipping markers.
Row 7: Knit 10, SM, Purl 95, SM, Knit 10
Row 8: Knit 10, SM, Knit 7, YO, K2tog, *Knit 9, YO, K2tog, repeat from * to last 8 sts, Knit 8, SM, Knit 10
Row 9: Knit 10, SM, Purl 95, SM, Knit 10
Row 10: Knit across slipping markers.
Row 11: Knit 10, SM, Purl 95, SM, Knit 10
Row 12: Knit across slipping markers.
Row 13: Knit 10, SM, Purl 95, SM, Knit 10
Row 14: Knit across slipping markers.
Row 15: Knit 10, SM, Purl 95, SM, Knit 10
Row 16: Knit across slipping markers.
Garter Ridge Row: Knit across slipping markers.
Pattern 2:
Row 1: Knit across slipping markers.
Row 2: Knit 10, SM, Purl 95, SM, Knit 10
Row 3: Knit across slipping markers.
Row 4: Knit 10, SM, Purl 95, SM, Knit 10
Row 5: Knit across slipping markers.
Row 6: Knit 10, SM, Purl 95, SM, Knit 10
Row 7: Knit across slipping markers.
Row 8: Knit 10, SM, Purl 13, YO, P2tog, *Purl 9, YO, P2tog, repeat from * to last 12 sts, Purl 12, SM, Knit 10
Row 9: Knit across slipping markers.
Row 10: Knit 10, SM, Purl 95, SM, Knit 10
Row 11: Knit across slipping markers.
Row 12: Knit 10, SM, Purl 95, SM, Knit 10
Row 13: Knit across slipping markers.
Row 14: Knit 10, SM, Purl 95, SM, Knit 10
Row 15: Knit across slipping markers.
Row 16: Knit 10, SM, Purl 95, SM, Knit 10
Garter Ridge Row 2: Knit 10, SM, Purl 95, SM, Knit 10
Repeat Patterns 1 and 2 four (4) more times, then repeat Pattern 1 through Row 16 once more removing Markers on last row. You will have 10 ridges.
Work in garter stitch for 15 rows and cast off loosely.
~Have a lovely day!
Saturday, November 21, 2015
...B. A. B. Y. Blanket Pattern...
...so I finally got 'round to writing up the pattern for the B.A.B.Y. Blanket...
...I knit mine in strips and joined as I went...by picking up stitches along the side of the strip just done and knitting them together with the last and first stitches of the rows of the next strip...
...same method as here...except instead of turning the block on it's side and matching horizontal to vertical stitches...it's a one to one match and vertical to vertical... ...just a quick sketch of the pattern... ...so I knit the first strip of 4 squares in stockinette stitch...alternating colours one white block of 35 stitches by 48 rows...followed by a blue block 35 by 48 rows...then another white one and another blue one...
...and I picked up the stitches along one side...
...my gauge was 24↑ X 16→ ...which works out to a 3 to 2 rise over run...you may have to adjust the number of stitches to get a perfectly square block... ...then I started the second strip...casting on 35 stitches in blue and knitting to the end of the row...picking up one stitch from the needle in the white square...you don't really have to pick up all the side stitches ahead of time...you could just pick them up as you go...whichever way is easiest for you... ...complete the strip with alternate blocks of white and blue... ...pick up the side stitches on the second strip...and cast on with white again for the third strip...and knit another strip just like the first one...white...blue...white...blue...picking up the stitches along the side of the second strip... ...then cast on with blue and knit the final strip alternating blue...white...blue...white...and picking up and knitting the stitches along the side of the third strip... ...now all four strips are complete... ...at this point embroider the letters diagonally across the front of the blanket one letter embroidered in blue in each of the white squares... ...using the charts below... ...embroider the letter B in the top left hand block... ...then a letter A in the next white block down diagonally...
...then embroider another B in the next white block down diagonally from the A... ...and finally embroider a Y in the bottom right hand white block... ...now because of the tendency of stockinette stitch to curl...the blanket needs some sort of a border to help it lie flat...I did a single crochet border for 7 rows of single crochet around the perimeter of the blanket...
...but you could pick up stitches around and knit in garter stitch for several rows...or if you're making the blanket for a baby girl a crocheted shell stitch border might be pretty...any border you like... Final Notes:
...I used size 10 US needles and a J crochet hook for the border...gauge is not terribly important for the finished size of the blanket...but you want to adjust the number of stitches you cast on so that your finished squares will be square...
~Have a lovely day!
Subscribe to:
Posts (Atom)