...the 'idea' for this little pressie for Our Airman has been 'brewing' for quite a while in the mind of Affectioknit...haha...
...on my desktop...I have a folder called "Projects"...and it contains a plethora of files...a lot of them are jpegs...some are just text files where I jotted down a few notes...and it could just as easily be called "Misc"...or "Stuff I'm Thinking About Making"...haha...I may rename the folder...
...because I had saved a jpeg of a "Retro - 80s Star Wars T-shirt" image to the folder...I've searched for that exact wording and not found the image again...or I'd link to it for you...wink...
...and you've actually already seen the finished shirt...because
he's wearing it in some of the Father's Day photos...
...anywhooo...I started out with a plain white T-shirt...that I stole from the Man...he rarely wears the white ones anymore...since he always wears a black clerical...he wears black ones so the white doesn't peak out from under his sleeves...anywhoooo...again...I wanted it to look "retro"...so and imperfect dye job is what I need...I should be pretty good at imperfection...haha...
...so I heated up some water and salt and created a dye bath...and just dunked the old t-shirt in for a few minutes...
...and a pretty imperfect dye job was easily acheived...haha...
...and printed out the image from the "Projects" folder...and taped it to some freezer paper...
...then...like I've done for all of my previous freezer paper stencils...I just cut out the image from the background using an exacto knife...don't worry about the stipes yet...since this will be a multi colour stencil...I'm planning to do those later with masking tape...you know...
since I've had issues with multi-coloured stencils before...
...I marked the center front of the t-shirt with some pins...this is an important step for me as I've misaligned a stencil before too...
...and then ironed the shirt...
...folded the stencil over enough to just pinch a mark in the top and bottom middle to line up with the pins...I didn't fold the entire stencil...
...and ironed it in place...
...then in order to line up the little middle bits...I put the paper cut outs back in place and then ironed the little middle bits in place...
...and the stencil is ready for paint...
...so I gathered my "retro" colours of outdoor paint...
...and since I'm going for an almost worn out old t-shirt vibe...I'm experimenting with how to acheive that look...leaving some of the t-shirt material visible in places...
...and a combination of brush strokes and spouncing...I think this is enough "wear"...
...so then I fully spounced the rest of the black...and this is the result...you can see little bits of the grey fabric but the letters should be clearly readable...
...and my absolute favorite part of any stenciling project...removing the stencil...
...TA-DAAAA...it's pretty cool just like this...
...but on to the stripes...
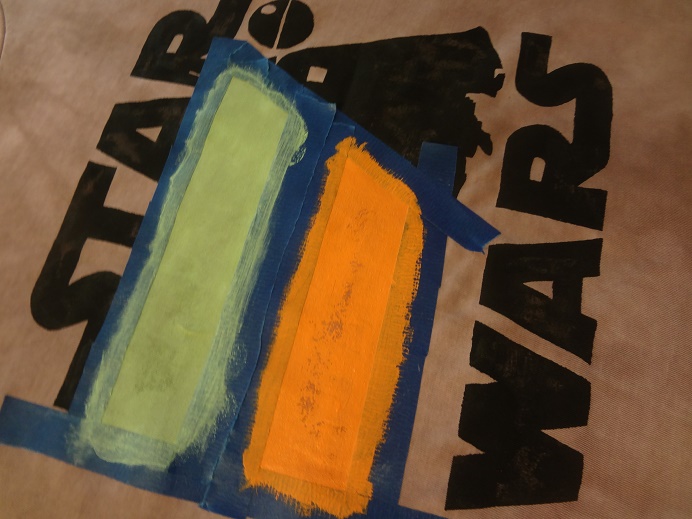
...there are four colour stripes...a minty green...a bright mustardy yellow...a sort of muted orange...and a sort of muted red...
...outlining the colour block with masking tape...hoping that this will prevent the bleed-through I had before trying to use a second stencil...this would probably not work very well with an elaborate design...but should be ok for a few stripes...
...I'll do the colours two at a time...and let them dry and then go back and mask the other two colours...
...mixed up a pale minty green...to match the colour from the jpeg...
...and painted that on using the same "worn-out" technique...
...and then the orange...the same way...
...while that was drying...I thought I'd tackle the little tiny instrument panel on Darth's chest...so I just dipped a toothpick in some black and red paint to make those shapes...
...then when the green and orange were sufficiently dry...I masked over those lines just with painter's tape...and painted the yellow and the red...
...and pulled off all the tape...I'm so happy with it...the masking tape worked really well...
...now all that's left is the thin little red light saber...so I used masking tape again for that...straight lines make it pretty easy to use masking tape...
...and I really couldn't hardly be more pleased with the way it turned out...
...it really does look like a super-loved-and-worn-old-80s-T-shirt...
...and Our Airman said he loves it too...he says it's super light and comfortable...important for the heat and humidity of a summer in Okinawa...
...what's in your workbasket this week?
~Have a lovely day!


That is another one of your amazing projects! Lucky airman! Love,
ReplyDeleteI love that t-shirt. You did a great job!!
ReplyDeleteGod bless.
Thanks Jackie,
Delete...it was a lot of fun...
~Have a lovely day!
that turned out perfectly!! He is going to LOVE that shirt.
ReplyDeleteThanks Karen,
Delete...it was a fun project...
~Have a lovely day!
That is an incredibly awesome shirt! Well done!
ReplyDeleteThanks Beth,
Delete...I love doing stencils like this...it's so satisfying to pull them off and reveal the perfectly crisp lines...
~Have a lovely day!