Saturday, December 23, 2017

...a simple gift card holder tutorial...

...and we're a little bit more 'ready' for Christmas...

...and this is another really simple little project that will take longer to explain than it will take to actually make...

...you know how all the Santa presents in this house get wrapped with gold paper...

...well one of the gifts is a gift card...so it will need a gold wrapped holder...which I don't have...and I don't relish the thought of heading to the shops this close to Christmas...

...so...let's just make one...
...gather some cardstock...glue...scissors and a hole punch...and your paper...(alternatively you could just use pretty gold cardstock...but I don't have any of that either)...
...spread a thin layer of glue over the entire area you'll be covering...
...and adhere your wrapping paper to that...
...pressing well to get out any air bubbles...
...then fold in half...this center fold is where the slit for the card will be...
...and fold again with a little bit of overlap to form the notch where the gift card will slide in...and a tie will go on the overlapped part...
...it will look sort of like an 'M' at this point...cut your card to length...I cut through all the layers at once...to make it as even as possible on the cut side...
...find the center of the gift card pocket...and punch a hole...just a little bit away from the edge...
...and then punch two more half holes...the correct distance for your gift card to slide into the pocket...
...it should look like this...
...and then make a cut from the center hole out to the bottom edge of your outer holes...
...cut along the thin line...
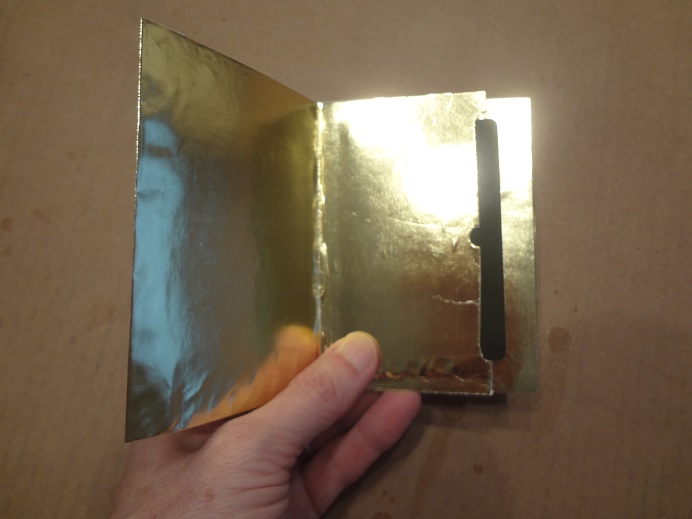
...and you'll be left with a slit and a pocket to slide in your gift card...
...open it out...
...turn it over and glue just the sides together...
...just around the two sides and the bottom to form the pocket for the card...
...let that dry well...
...it will look more like a letter 'T' now...
...once it's dry you can do a test fit with your gift card...
...perfect...
...finally...cut a little notch in the center of the overlapped ends...
...alternatively you could use your hole punch...
...slip a ribbon through...
...and tie it up...

...so then I made another one...
...just from some heavy kraft paper...because this gift card is not from Santa...it doesn't need to be wrapped in gold...haha...
...really this was just a 15 minute or so project...and it really did take longer to tell about it than to actually do it...

~Have a lovely day!

Friday, December 22, 2017

...a bit more elving...

...I have not done a lot of handmade Christmas gifts this year...but...Amy and I got together for our Christmas brunch...and I wanted to include at least a little something handmade for her...
...I get these nice thick rubber bands around every bunch of kale I buy...(and I buy a lot of kale)...I keep a small jar of them in my kitchen drawer...and they're handy for all sorts of things...
...but they'll also make a perfect hair doodie...wrapped with yarn of course...so it won't stick and pull out hair...
...I just single crocheted around the rubber band with an entire strand of Sashay ruffle yarn...
...joined that and then pulled out the 'ruffle' part of the yarn...
...and single crocheted just the top loop of that...
...I did two rounds of ruffle...
...and then I tried it on...just to make sure the ruffle worked out all right when it was in place...

...are you still elving...or all finished?...

~Have a lovely day!

Thursday, December 21, 2017

...Other People's Elving...

...We have been the thankful recipients of some other people's elving too...
...my sweet sissie sent this huge bag of fruit...so I broke into that right away for a snack...delicious...
...and I had a meet up with a dear old college chum...and she gifted us this lovely antique dish...it's perfect for cranberry sauce on Christmas day...don't ya think...
...and this this package arrived on our doorstep...just like that...no box or anything...from Mom and Frank...and that'll come in very handy for all our projects...

...just a bit more elving here and then we'll be ready...

~Have a lovely day!

Wednesday, December 20, 2017

...W.I.P. Wednesday...

...a little bit of Christmas elving...

...and you've actually seen it all before in 2016...when I made Scout's Graduation ornament...
...but this is a 2017 Graduation for Our Girl...

...I had saved all of the supplies...of course...
...I just used the cardboard from the graduation keyring...which I had bought way back in May or June and just stuck in the baggie with the thread...you can't easily find them this time of year...
...tied the top and slipped the cardboard out...
...added the clamp with the 2017 charm...
...put some fray stop on the threads...clipped the bottom and hung it up to dry...
...OK...this part I got wrong...haha...I tied the tassle around the little prongs that hold the cap on the glass ornament...but I should have left the cap on...I had to re-do this part...so funny...
...but the point was to give the tassle a little bit of clearance hanging down from the top...so that you can see the top of the tassle inside the glass ball...
...a test fit...whew...the charm fits through the opening...
...then I realized I needed to put the cap back on the prongs...hehe...
...I was going to just tuck it into her stocking...but decided against that as it really is glass and I don't want it to get broken...it's pretty fragile...
...so...I found this adorable take-out box style holder and tucked it into that...

...what elving have you been doing?...

~Have a lovely day!

Tuesday, December 19, 2017

...getting ready for...Tuesdays with Julia...

I don't have a recipe up at The Vegan Version...but in preparation for all my Christmas cooking with Julia...

...I made Vegan Butter...
...I gathered some ingredients...I basically used Miyoko's recipe but I made a few changes so I'll list everything I actually used below...
...it's super-duper easy...because all you do is put everything into the blender...
...it whips up into a beautiful creamy/buttery yellow...and it tastes just like butter...
...it didn't take long to harden up in the fridge...
...I just ran a knife along the un-papered edges...
...and the block of vegan butter popped right out..
...see how perfect that looks...
...I cut it into 5 quarters...haha...5/4s...mine are a little bit shorter than a true quarter...so there are 5 of them...
...individually wrapped in waxed paper...
...and then I popped them into a ziplock baggie...

...a couple of notes...this vegan butter is very firm...and when I make it again...I'm going to add more than 1/2 teaspoon of salt...I just like saltier butter I guess...

...and cost-wise...I think this is probably more expensive than Earth Balance...(which I regularly get at the regular grocery store for $3.99)...but I didn't really do a cost analysis...the soy lecithin will last a long long time...but the coconut oil is $5 a jar...and you'll only get one recipe from a jar with a little bit leftover...

....but on the pro side...there are only a few ingredients...and none of them is palm-oil...so I think I'll definitely be making this again...and again...

Affectioknit's Vegan Butter (adapted from Miyoko's Vegan Butter)...

Ingredients

1/4 cup Soy Milk
1/4 cup Vegan Whey leftover from making probiotic soy yogurt
1 teaspoon apple cider vinegar
1/2 teaspoon sea salt (I'll be adding 3/4 teaspoon next time)
1 1/2 cups refined coconut oil measured after melting
1/4 cup liquid oil – canola, grapeseed, or olive...I used Safflower...
2 teaspoons liquid lecithin

Instructions

Combine all ingredients in a blender and process at a medium speed for about one minute. Pour into a container of your choice...I used my old old recipe box lined with parchment...

Set it in the refrigerator until hard.

...have you tried making vegan butter?...

~Have a lovely day!